How to Read Books with LingQ: Complete Beginner's Guide

This post contains affiliate links. I may earn a commission on purchases made through links in this post. Read full affiliate disclaimer here.
Table of Contents
- 1. The 10-Minute Setup That Changes Everything
- 2. Building Your First 1,000 Words (Your Minimum Foundation)
- 3. The Complete LingQ Reading Workflow (step-by-step process)
- 4. Choosing Your First Book
- 5. Converting E-books and Importing Them to LingQ
- 6. Two Traps to Avoid (you'll thank me later)
- 7. Building Your Reading Streak (the consistency secret)
- 8. Long-term Benefits and What to Expect
Reading books is one of the most effective ways to build vocabulary, but it seems impossible to do in your target language when you're just starting out. LingQ, however, turns reading into some that’s achievable and motivating.
I’ve used LingQ daily for over 6 years, reading 40+ books across Cantonese, Finnish, and Spanish. It’s become my go-to tool for reading in foreign languages (for my full LingQ review after 6+ years of daily use, check it out here).
These reading skills have surprisingly also spilled over to several other areas, like improved listening comprehension, speaking, and writing. Plus, reading is super fun! Especially when you get to choose what books you read.
The problem: Starting with LingQ can feel a bit overwhelming at first. The interface isn’t immediately intuitive, and it’s not obvious how to get from “complete beginner” to “reading actual books”. For that reason, I wanted to provide a clear, step-by-step LingQ tutorial to help beginners get from all the way from zero to reading your first book successfully.
This LingQ beginner guide walk you through everything—the right setup with optimal settings, tutorial on how to read and use the tools in LingQ, finding and importing your first book successfully, traps to avoid, and tips that will ensure your success.
The best part? Once you follow these steps and you’ve read your first book, you now have the blueprint to reach advanced reading fluency in your target language.
1. The 10-Minute Setup That Changes Everything
If you don’t have a LingQ account yet, lets first get you set up with an extended free trial + extra discount.
We’ll then configure and tweak the reading settings on your LingQ app to ensure effective learning and a smooth reading experience.
Already a LingQ user? Jump straight to → The Ultimate LingQ Settings (copy my exact configuration)
Creating Your Account
Click the button below to sign up. You’ll get a longer free trial (120 lingqs instead of the usual 20) + 5% off annual plans:
This takes you to the free trial signup page (no credit card is needed for the free trial). Fill in your information and then click “Create account”.
You’ll right away be taken to the payment page, with the annual plan pre-selected and 5% off discount included. This is completely normal - they’re just hoping you’d upgrade right away.
Here’s what to do:
If you want to start free: Click the three lines at the top left side (shown in the screenshot below).
If you're already ready to upgrade: This is actually the perfect time since my 5% extra discount (on top of the 33% off) is auto-applied for annual plans (use code b_12lingtuitive if you upgrade later).
The 100 extra LingQs are already applied to your account regardless of what you choose here.
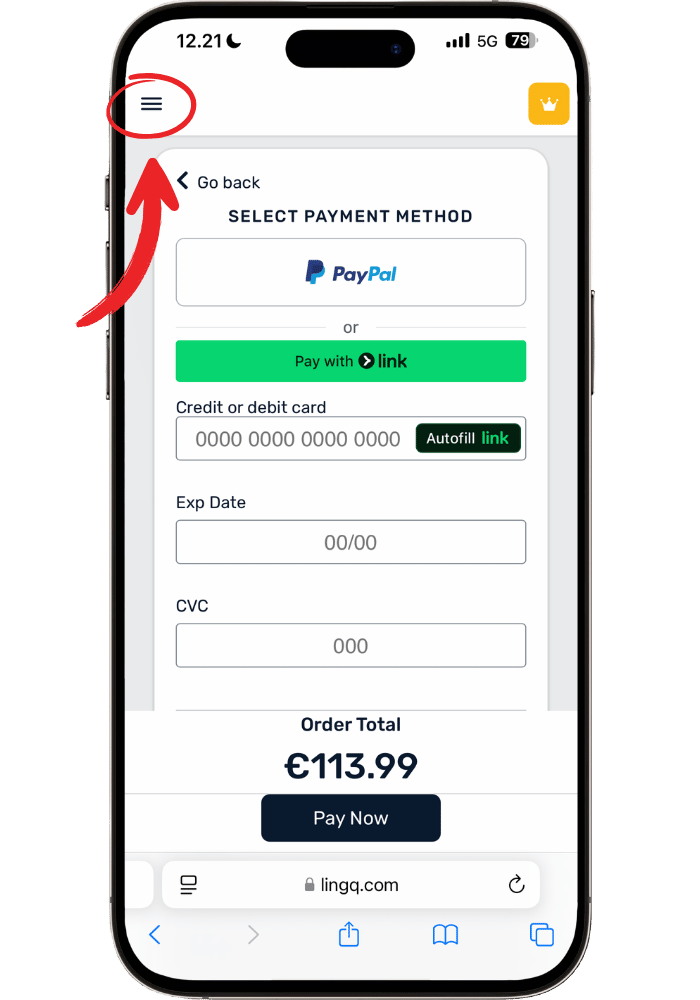
After you’ve clicked the three lines, go to “Lessons” to find the content library. I recommend downloading the LingQ app for the best reading experience on phone.
We’ll go through the exact reading workflow and where I recommend to begin in section → 3. The Complete LingQ Reading Workflow (step-by-step process).
The Ultimate LingQ Settings (copy my exact configuration)
Before we start to read books with LingQ, we’ll need to make sure you have the best settings. There are a lot of settings to choose from and they actually make a bigger impact than you’d think. The right settings will ensure effective language learning and a smooth workflow.
See my post: The Ultimate LingQ Settings Guide: Complete Setup Tutorial to optimize these. There’s a detailed breakdown of each setting and which one I recommend.
Need a faster setup? Use the Quick Setup Checklist for all settings at once, or simply copy the settings from each screenshot as you go through the guide. You’ll be good to go in no-time!
2. Building Your First 1,000 Words (Your Minimum Foundation)
Before you can read books with LingQ effectively, it’s a good idea to build some foundational vocabulary first. Otherwise, your first book will feel painfully slow since all words will be unknown.
How many words should you know before starting to read a book? This vary significantly between languages. Slavic languages (with heavy conjugation) will have a higher word count than Chinese (which doesn’t conjugate), while Romance languages fall somewhere in-between.
My recommendation: build at least 1,000 known words before reading your first book. You can however set it higher to 2,000 or 3,000 too before starting to make it a bit more comfortable (my word count was around 2-3,000 when I started reading my first book in Spanish and it was a great time to start). That said, there’s no ‘perfect’ time to start your first book. It will be challenging no matter what, especially for languages with a different script. My first book in Chinese was painfully slow but still so rewarding; Spanish was easier but still a challenge.
The encouraging part: Adding words to known at the beginning is the slowest. But it starts snowballing and there comes a point when adding new words becomes incredibly fast. I noticed this at around 1,000-2,000 words in Cantonese, 4,000-5,000 words in Spanish, and 10,000-20,000 words in Finnish. Once you reach this, reading becomes even more of a blast!
The key: Set a goal, reach it, and then dive into your first book!
3. The Complete LingQ Reading Workflow (step-by-step process)
Now that you have LingQ set up with optimized settings, you’re ready to start your first lesson and start building that foundational vocabulary you need to read your first book. For this tutorial, we’ll use the first LingQ mini story since they are a good place to start for complete beginners.
(If your language doesn’t have mini stories yet, pick any content ‘Beginner 1’ content - the same workflow will apply no matter what you read).
This section will guide you step-by-step on how to read with LingQ, including screenshots of every step. We’ll be using Italian 🇮🇹 as our example here but the same flow will apply no matter what language you’re learning. Once you have learned this workflow, you’ll be confident in how to use LingQ with any content.
Let’s get started!
1) Click on the first mini story to open up your first LingQ lesson (it should be pinned at the top of your lesson library when you open up LingQ. If not, use the search 🔍 function to find or simply scroll until you find it).

2) Now that you’re in your first lesson, you’ll see that all the words are blue. This means LingQ considers all these words as new or ‘unknown’ to you. It simply means you’ve never seen them before in any content.
What we need to do is: click on the words and choose their definitions. This will make them into “lingQs”—which will turn them yellow.
Quick color guide:
Blue = New words you've never seen before
Yellow = LingQs (words you’ve seen before but don’t know yet, i.e.—”learning”)
White/no highlight = Known words, ignored words (i.e. names, places).
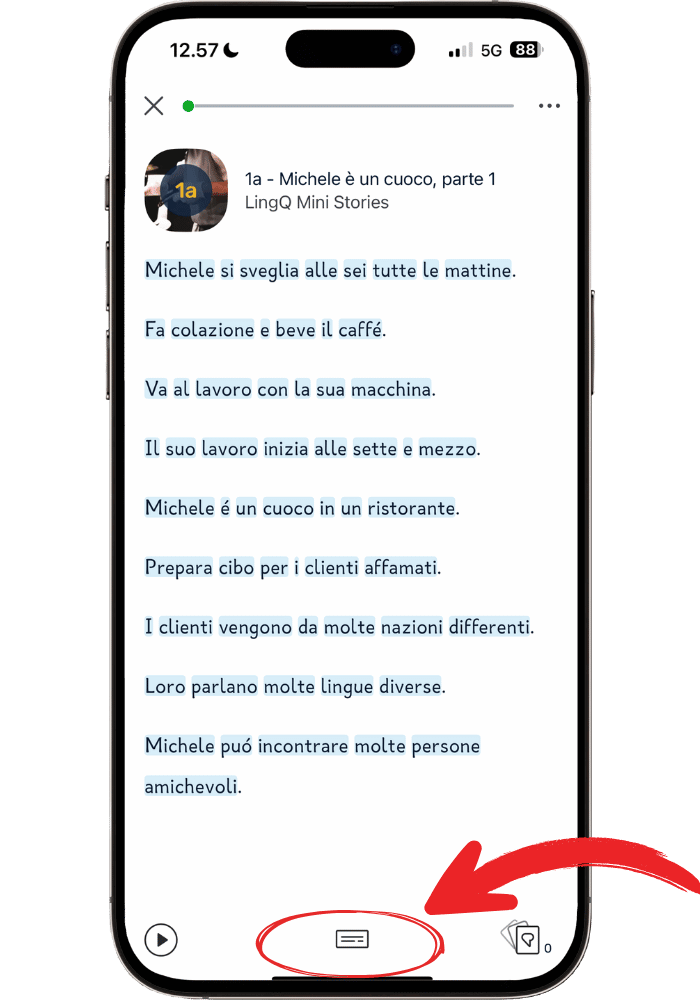
Feels overwhelming will all these unknown blue words? No worries! Next, we’ll go into “Sentence Mode” to make things much more manageable. This is a completely new language to us after all.
Click the icon that looks like a page at the bottom middle to enter “Sentence Mode”.
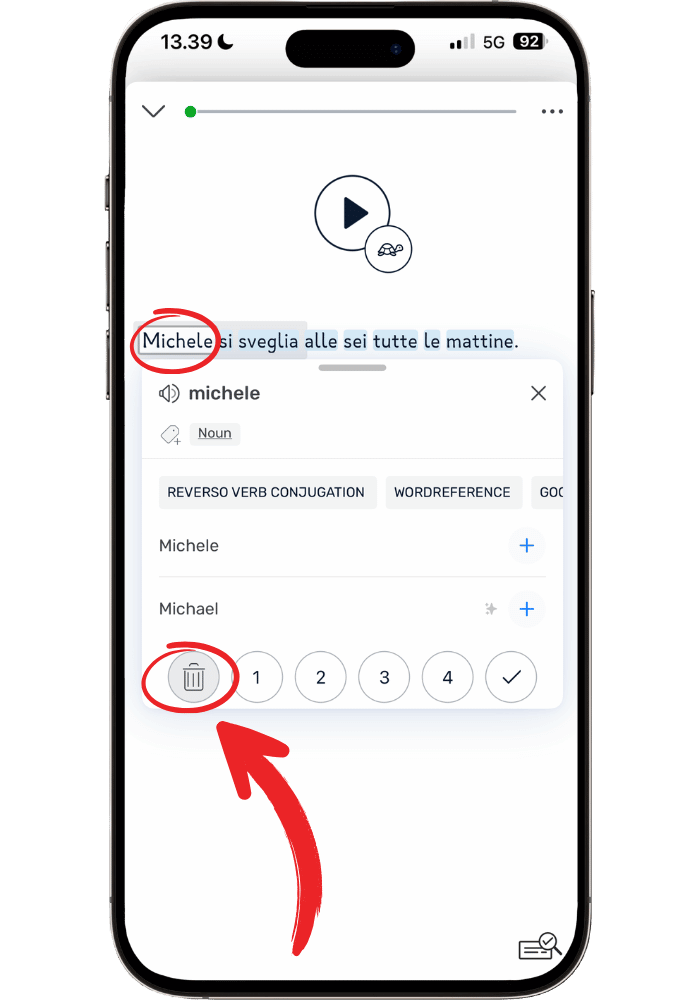
3) Now in Sentence Mode, it will be easier to work through one sentence at a time, one word at a time.
Click on the first word that you see, in this case - “Michele”.
This word turns out to be a name. And since names are self-explanatory and don’t have definitions, we don’t need them to be counted towards our “Known Words”. Instead, we simply “ignore” it.
How to ignore a word:
Click on the trash bin icon 🗑️ in the pop-up window—it will become non-highlighted (just like “known words”).
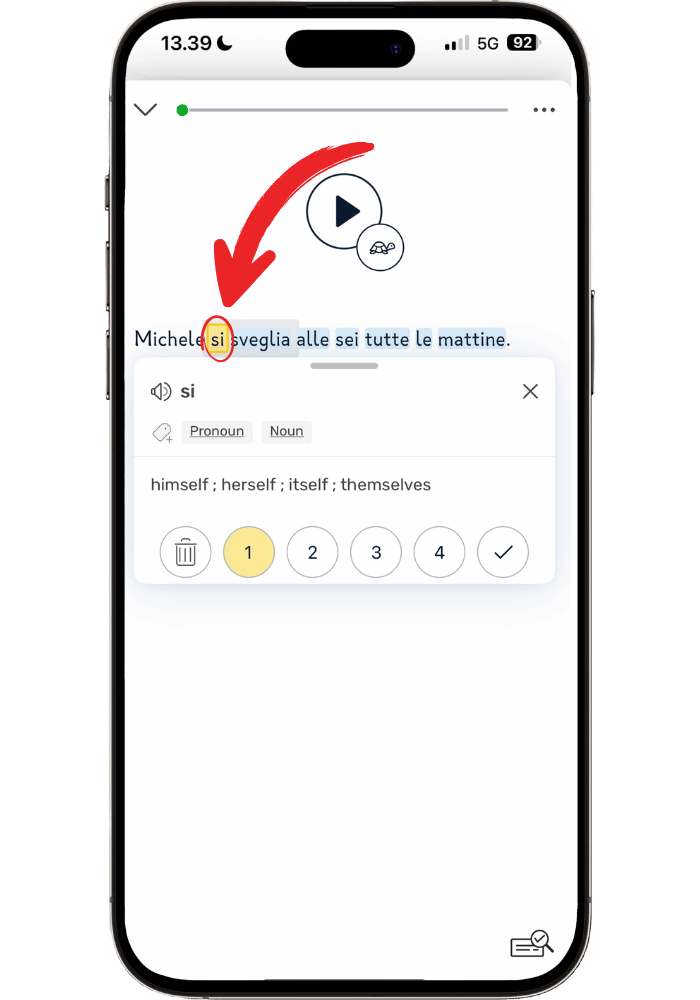
4) Now let’s move on to the next word, which is the word “si” in Italian.
When you click on it, you’ll see two definitions:
The first one is the most popular one (the one most LingQ users have chosen—i.e. the most commonly used one).
The second definition (that has a ✨ icon next to it) is a context-based AI definition. AI will suggest what it thinks is the most accurate and fitting definition for this particular sentence and context (and in my experience, it’s pretty spot-on like 93% of the time).
Choose a definition.

5) Congratulations! You have now created your first lingq!
Simply by choosing a definition, this word is now yellow - to indicate it’s a lingQ. This means it’s a word you don’t know yet but are in the process of learning.
Important: If you've set up your settings correctly, you'll hear each word pronounced automatically when you click on them. If you don’t hear the pronunciation automatically, check this section of my Ultimate LingQ Settings Guide to enable text-to-speech. This will avoid bad pronunciation habits by hearing how the words are correctly pronounced when reading them.
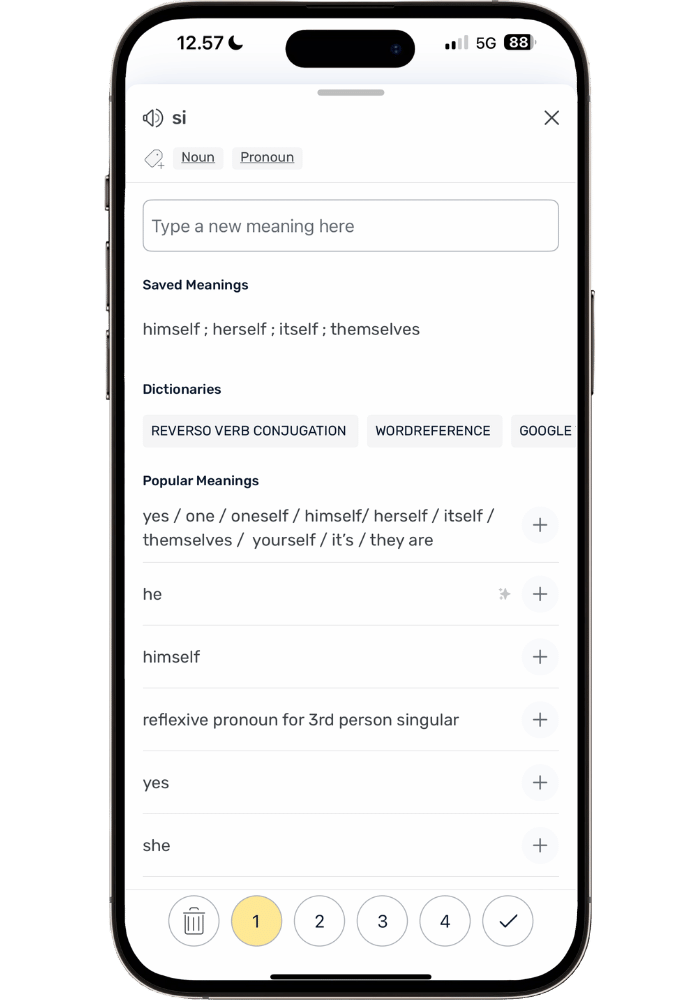
6) To see even more definitions:
Click a word
In the pop-up window, swipe up like in the picture below:
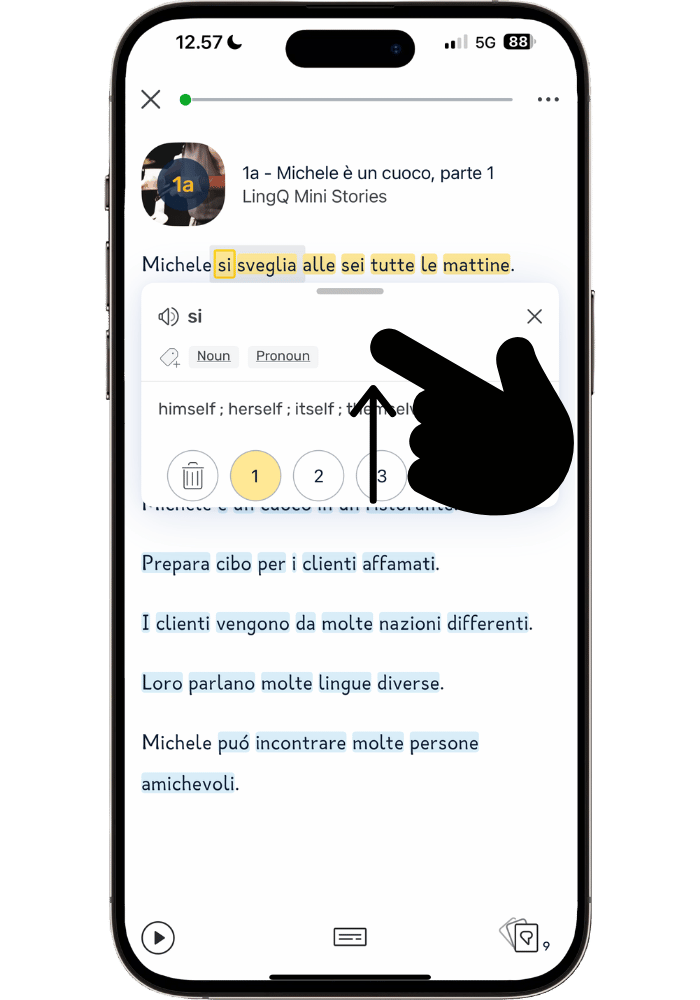
Click View Dictionaries and Meanings

Voilá! You can now scroll different definitions and even add multiple ones. This is especially handy for words that might mean different things in different contexts (think of the difference of: “match” as in “competition”, or a “match” you light to start a fire).
You’ll see all your added definitions whenever you click on this word in any future context.
You don’t have to add all definitions now though—you can always add more later.
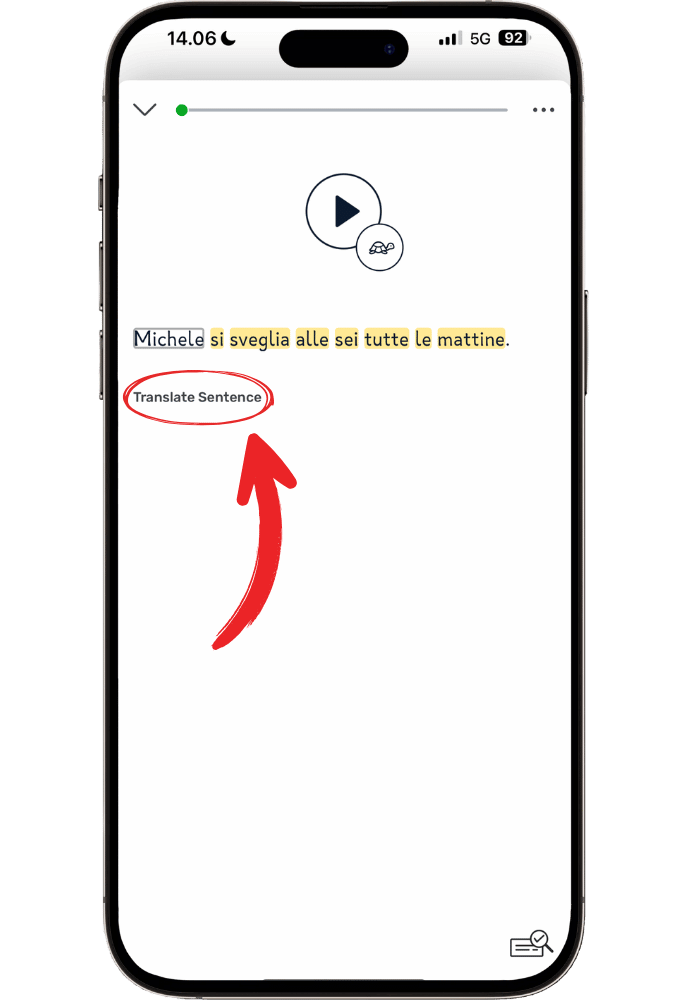
7) Click on all the words in the sentence and make them into lingQs.
Read the whole sentence and try to understand what it means now that you have uncovered the meaning of each word.
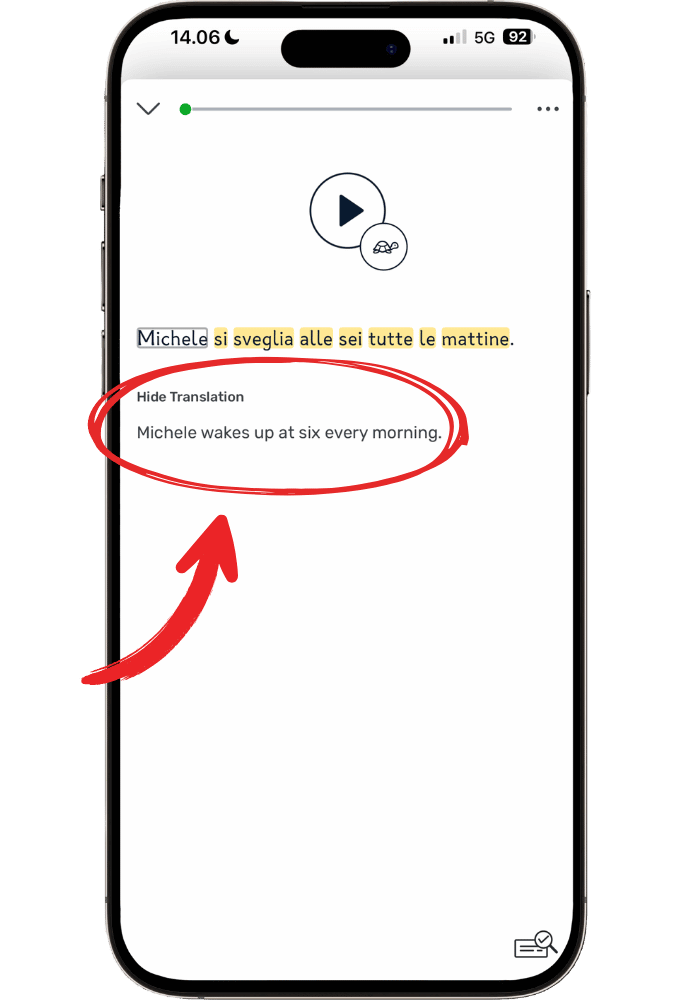
If needed, click on ‘Translate Sentence’ to see what the complete sentence mean as a whole. This will often give you a more accurate meaning of what the words mean, since a lot of it is contextual.
Optional - Listen to the whole sentence: Press the play button ▶️ to hear the sentence spoken by a native speaker. This is even available for books, although there will be a text-to-speech voice instead of a real recording. When purely reading, you don’t have to listen to every single sentence (although I do recommend at least hearing the pronunciation of each word through text-to-speech), but it’s a helpful feature for when you want to hear how the sentence flows.
If you’re working with a podcast, YouTube video, or any content that has original audio this feature becomes even more useful.
8) Once you know what a word means, you click the ☑️ icon. That will remove the highlighting of the word and it will now count towards your “Known Words”.
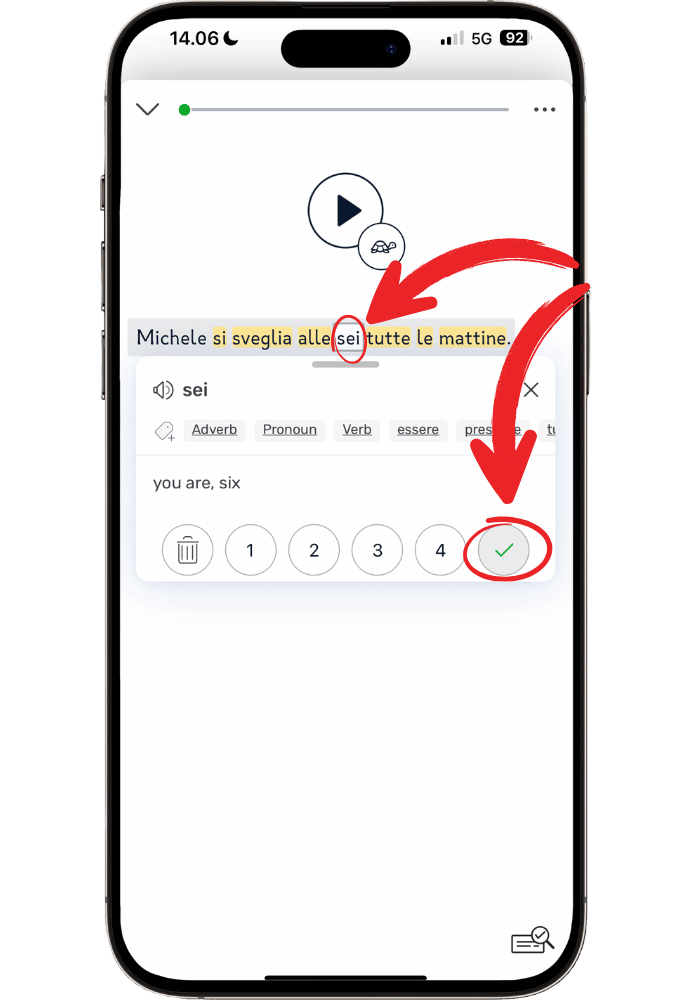
The magic of LingQ is that it will keep track of all these “Known Words”. This is huge for motivation! Because when you’re learning a language it can oftentimes be difficult to feel the progress. This way, you get a tangible and concrete way of knowing you’re improving - by seeing the word count go up.
Below you can see how the word we marked as “Known” before is now in our LingQ progress tracker:

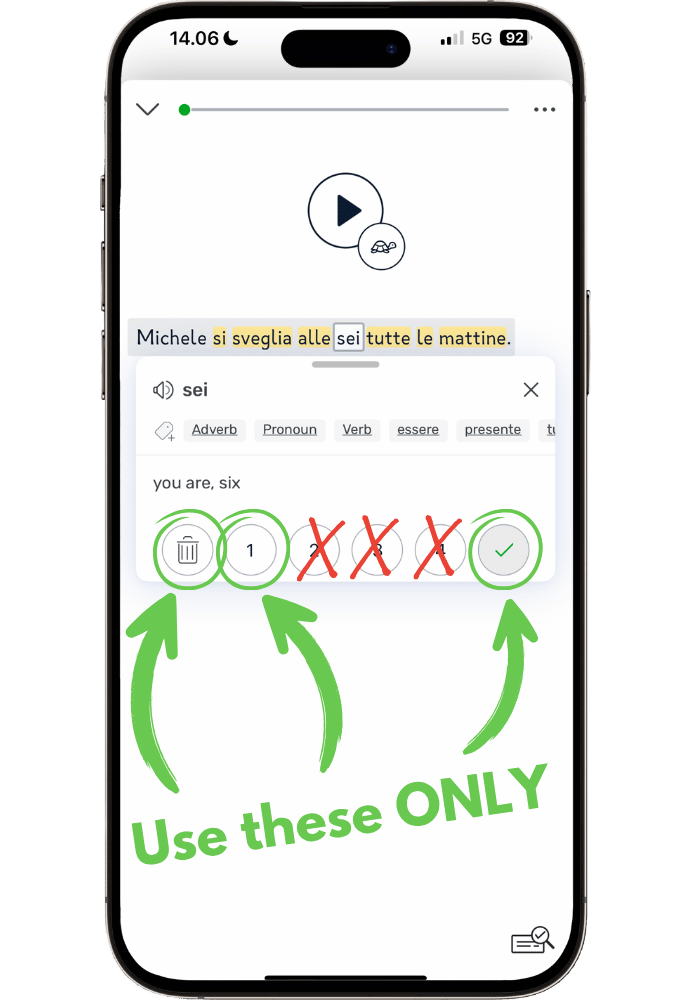
This number will only continue to grow as you read, and I guarantee you’ll notice a difference as you hit 100, 1,000, 10,000, and even 30,000 and beyond! This might sound impossible to achieve, but you’ll find that the amount of known words will just automatically go up as you keep reading and see the words in different contexts. And at a certain point, the rate at which you’ll add words to known will increase dramatically.
Eventually—if you keep going long enough—your LingQ stats page will eventually look something like my current Cantonese stats:
That’s basically it! Once you have clicked on all the words of a sentence, chosen their definitions, read the whole sentence once or twice and recognized what it means—just move on to the next one! Don’t worry if you have already forgotten what the previous sentence means. Learning and forgetting is part of the language learning process. Eventually you’ll just remember effortlessly by enough exposure of words in different contexts.
Here’s what you DON’T need to do:
You don’t need to understand all the grammar—It will come with time and enough exposure.
You don’t need to try and remember the words—Some words you might remember right away, some will take seeing them 50 times before they stick - that’s completely normal! No need to force your brain to memorize them, you will eventually learn them.
No need to re-read—The beauty of reading with LingQ is that you don’t have to re-read or review anything. The reviewing happens naturally by seeing words in different contexts, offering a type of natural spaced repetition.
The key to reading is: Just keep going, make lingQs, turn the pages, and add words to known as you recognize what they mean without having to click on them.
Bonus Tips for a Smoother LingQ Experience
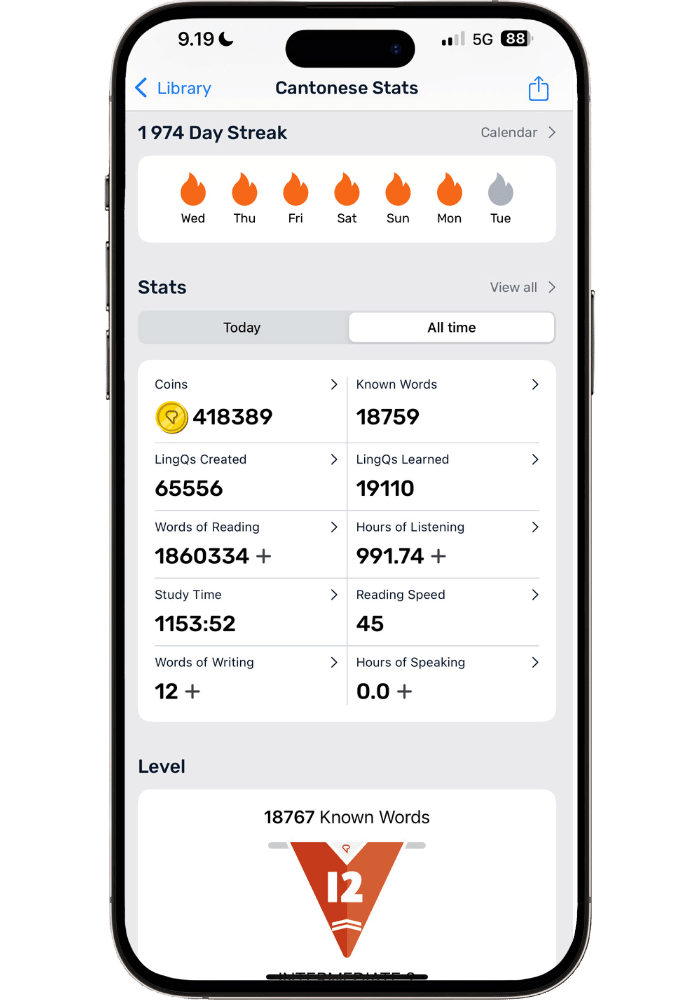
Simplified word statuses: LingQ offers levels 1-4 to track how well you know a word, but I find it's difficult to judge exactly how well I know something, and to me it just complicates the workflow.
I personally like to keep things simple by using only four word statuses:
New (blue - first time seeing it)
LingQ/Level 1 (yellow - learning)
Known (white/no highlight)
Ignored (white/no highlight - for names, etc.).
So I stick with Level 1 for all my LingQs (skipping 2-4) - I either know the word or I don’t. To me, this makes lingQing more straightforward and eliminates the mental overload of having to constantly evaluate how well I know a word.
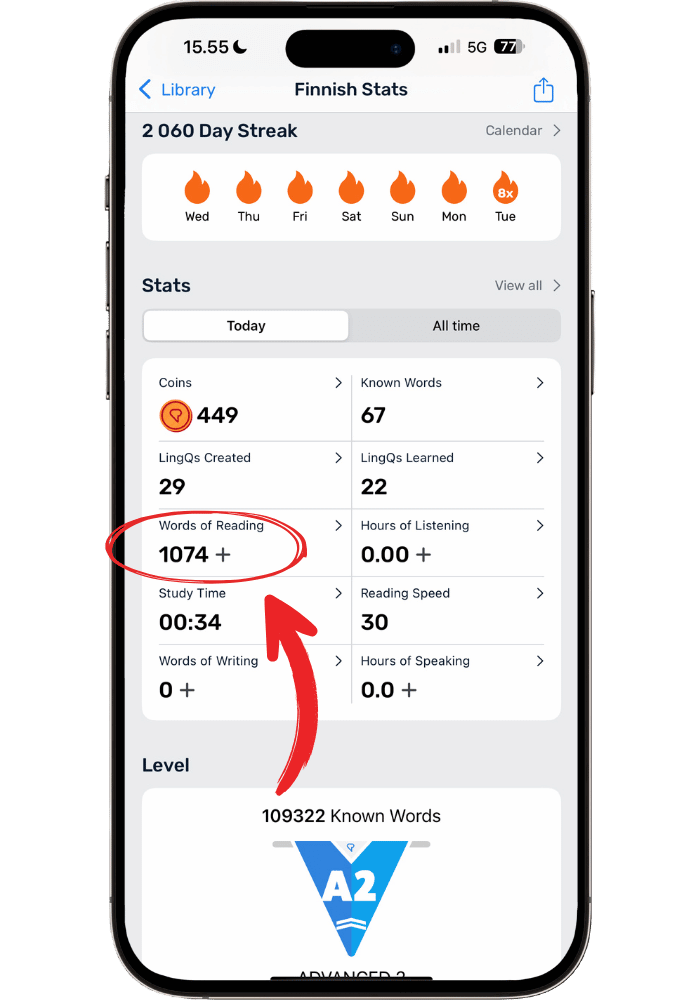
When to stop for the day: While LingQ will sync what page you’re on between devices, how do you know where on the page you left off last time? Look for natural paragraph breaks with blue words as markers—that's where you'll pick up next time.
Simply: If you see blue words in this paragraph, you know it’s a section you haven’t read yet. No blue words on the page? Read until the end of the last complete paragraph on the screen. Start again next time where the red arrow indicates:

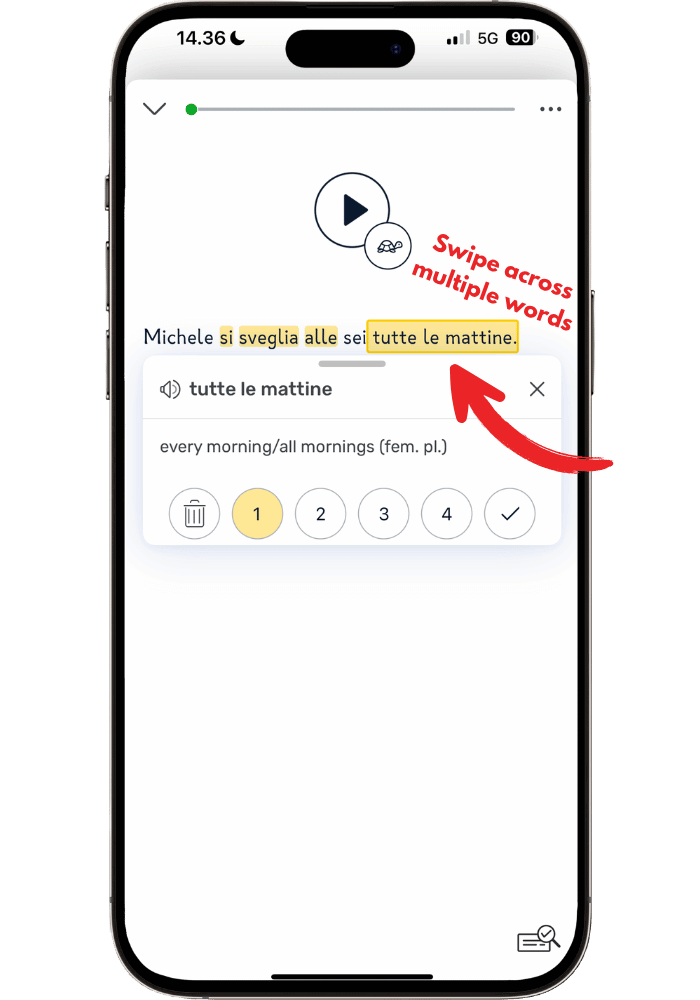
Save Phrases with Multiple Words: A helpful feature is that you can also save whole phrases that contain 2-3 or more words. This is especially helpful when it comes to sayings - as they might only make sense as a whole and not by its separate words. Think "by the way" - the individual words "by," "the," and "way" don't give you the meaning, but together they signal you're about to mention something unrelated to the current topic.
How to do it: Swipe across from the first word to the last word in a phrase, then select a definition.
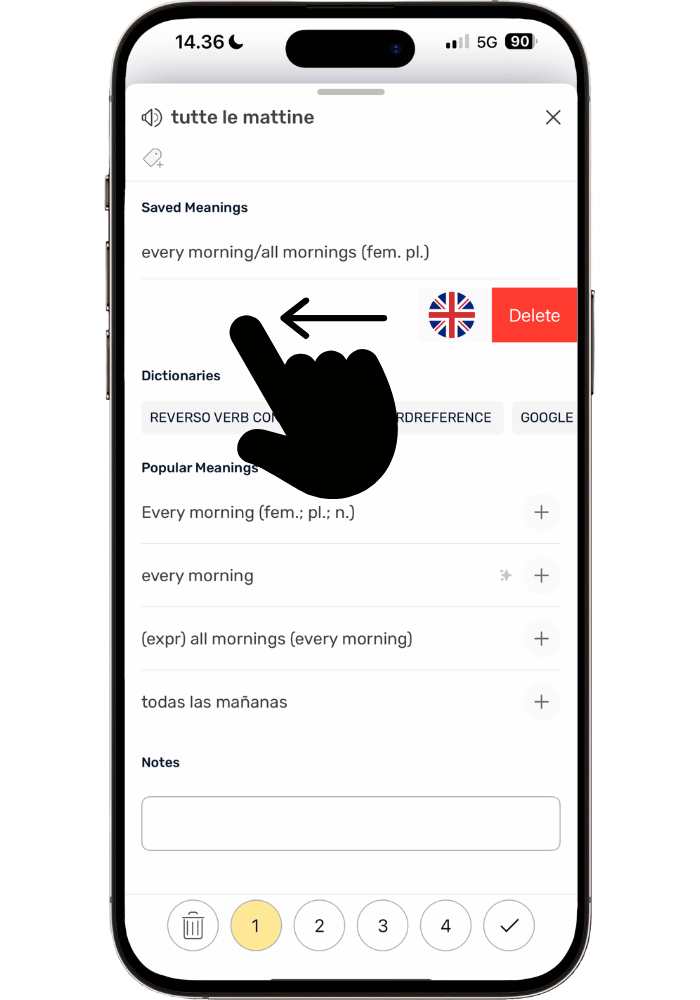
How to “delete” unwanted definitions: This is helpful to remove overwhelm with too many definitions every time you click on a word.
Here’s how to delete them:
Click on a word
Click the definition OR swipe up - this will bring up all the definitions you have chosen.
Swipe left over the definition you want to delete and then press the red “Delete” button that shows up.
When to make words “known”? My rule of thumb is that if I see a new word that I don’t know that I make into a lingq, I won’t make it “Known” that day - even if I see it later in a different context and remember what it means.
Instead, I will add it to “Known” the next time I’ll see it. Whether that’s the next day, a week, or month from now. Because then it’s more likely I actually know the word, rather it just being fresh in my memory for having seen it 5 minutes ago.
Keep in mind: Don’t worry if you forget the meaning of a word you had marked as “Known”. This is common. Just mark it as a LingQ again.
4. Choosing Your First Book
Now that you've built up some basic vocabulary and reached your goal, it's time to choose your first book. This is when things start to get really fun, and it will boost your confidence to read in your target language.
How do you choose your first book? Here’s what I recommend:
Non-fiction - Autobiographies, personal development books, etc. tend to be easier than fantasy and crime. They typically use simpler, everyday language with less complex vocabulary.
Something you’re already familiar with - Read a book you’ve already read before in your native language or English. My wife, for example, read the Harry Potter books to learn Swedish. This allowed her to start with a genre that might otherwise have been too difficult for her at the time.
Keep in mind: The goal is just to make it through your first book—from start to finish. You will then have a foundation of vocabulary and confidence to keep reading more and more books.
5. Converting E-books and Importing Them to LingQ
Now that we’re ready to read a book we need to do three things:
Find e-books
Convert them
Import them into LingQ
Where to Get E-books
Popular places to find e-books in different languages include Kobo, Google Books, and Amazon (Kobo is my personal favorite).
The best place to find e-books will vary depending on language. Many countries will have their own online bookstores where you’ll find e-books in your target language. For example, Adlibris has quite a good selection of Nordic languages, Ebok has Norwegian books, and Casa Del Libro Spanish books.
The important key: Look for stores that have e-books in downloadable formats (EPUB, PDF). Many online stores will only let you read in their dedicated reader, which makes them not compatible with LingQ.
And for stores like Google Books, make sure they’re in a “Flowing Text” or “re-flowable format” (it’s the most common). If they’re in “Original Pages” or “fixed-page layout” they won’t work with LingQ.
Converting E-books for LingQ
Even after downloading the book, many times you’ll still need to convert them to be able to import them to LingQ.
The good news is that once you learn how to do it, it’s very easy to do for all future books.
Two options for ebook conversion:
Calibre (free but more setup - find instructions here)
Epubor ($29.99 but easier)
The reality: It can be a bit of a learning curve but well worth it to be able to read any book you want in LingQ. I have bought and successfully imported 50+ books to LingQ, in different languages, and from several different online stores. Once you get the hang of it it’s actually not very difficult!
How to Import Books into LingQ in Three Clicks
Once you have converted your books, it’s super easy to import them into LingQ. To do this, we’ll need to use the desktop version of LingQ.
Here’s how to import your ebook to LingQ:
Click Import
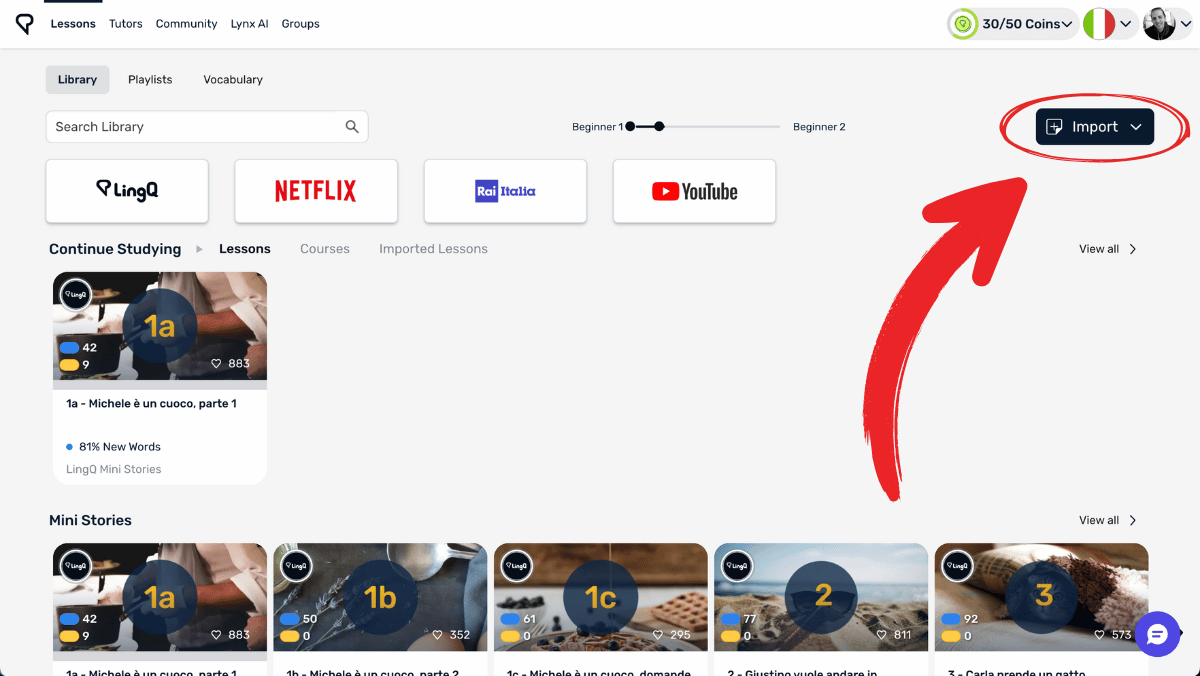
Select Ebook/File from the dropdown options
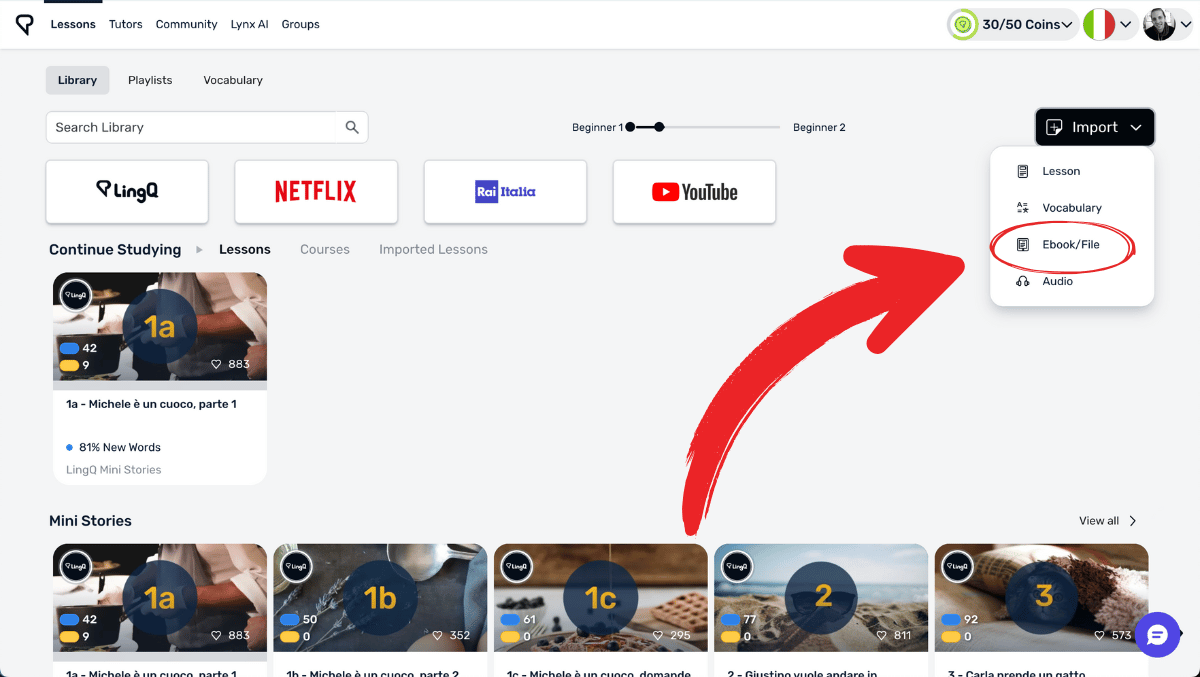
Drag and drop your converted ebook file into the window you see in the screenshot below, OR choose Select file to select it from your computer
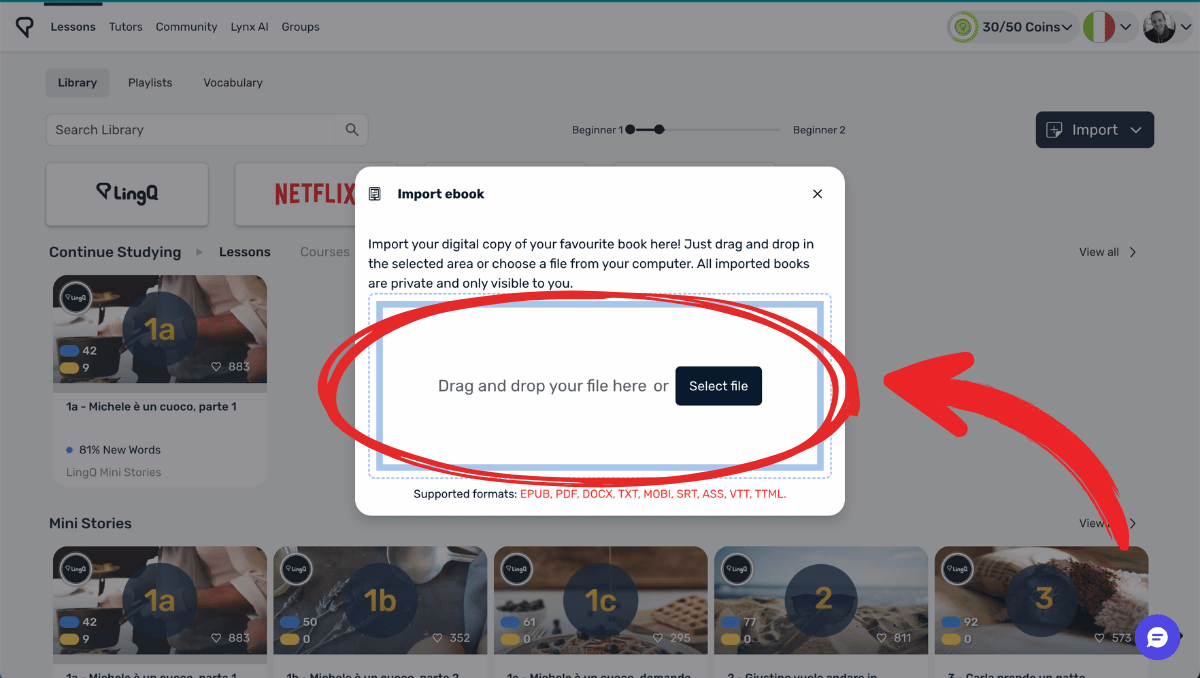
This will automatically transform your book into your own LingQ course (the whole book), which is divided into different lessons (LingQ chapters).
Once your book is imported, you can read them on any device! I prefer mobile since it’s super convenient to just pull up your phone and read a few pages whenever you have a minute.
Keep in mind: If your e-book fails to import, it most likely needs to be converted. Jump back to → Converting E-books for LingQ to learn how to do that.
Remember: Once you're reading books, the workflow I walked you through in 3. The Complete LingQ Reading Workflow (step-by-step process) is the same - but just expect it to feel much slower and more challenging initially.
6. Two Traps to Avoid (you'll thank me later)
There are two traps I've found especially important to avoid when reading with LingQ. By avoiding these, you'll set yourself up for long-term success.
Not prioritizing listening
Reading is incredibly effective for building vocabulary, but don't get too reading-heavy if you also want to speak well. Listening is what influences your speaking the most. Reading supports listening and makes listening comprehension easier, but you still have to listen a lot to get good at listening comprehension. And your speaking won’t improve without that solid listening foundation.
Why listening is crucial: Listening lets you internalize how the language actually sounds, flows, and feels. You internalize natural rhythm, intonation, and pronunciation patterns that you simply can't get from reading books alone.
How much should you listen compared to reading? Listen at least twice as much as you read. If you read for 30 minutes daily, listen for an hour. This is just a rule of thumb. Don’t stress about it if you read more some days, but prioritize listening overall.
How they work together: Reading enforces listening because you’re exposed to a lot of different words, you just need to learn to recognize them when listening and hear how they flow in speech. Plus, reading builds a rich vocabulary that makes you articulate when speaking. People who express themselves well are typically always big readers.
So it’s not that reading a lot is a problem—it’s reading while neglecting listening.
That said, everyone is different. If you find you always filter the new sounds of your target language through your native language, using purely audio-based materials at first might be a good idea. Then add reading later when you’re ready.
Getting burnt out by too high goals
The second trap you want to avoid is setting too high goals. This is a sure-fire way to burn out and quit. To make sure this doesn’t happen, it’s important to start small.
So when you first start, keep your goals low. Rather out-do your goals just because you’re enjoying yourself so much. And stop when you still have some left in the tank. Increase the goals whenever you feel it’s natural to do so. As you build your daily reading (and listening) habit you’re going to want to naturally increase your daily goals, especially when you notice progress.
What kind of goals should you set? Keep reading and we’ll talk about exactly that.
Get My Free Language Learning Guide Intuitive Language Secrets!
Learn how to learn any language intuitively in my free guide—download now by clicking below!
Download Free Guide7. Building Your Reading Streak (the consistency secret)
The key to being successful reading in LingQ is being consistent with it — showing up every single day, no matter what. If you do that, your vocabulary and comprehension will grow massively over time.
Daily Streak & Your Personal Daily Goal
The thing with learning a language, or growing any skill, is that every day is different. Some days we’re on a roll and some days it’s a struggle. That’s why we need something to make sure we keep doing it every day, even when we don’t feel our best or even feel like doing it.
The ‘Daily Streak’ in LingQ is a helpful feature to help us stay on track. Because once you have built a daily streak over weeks and months - you don’t want to lose it! LingQ uses coins as a benchmark for these daily streak goals. They can be set at different levels of 50, 100, 200, or 400 coins that you need to reach to maintain your streak.
However, I recommend setting goals based on one of two things instead of coins:
Words of Reading or Time Spent Reading.
That way, it’s easier to keep track of different goals for listening and reading.
A goal based on ‘Words of Reading’: 1,000 words read per day
A time-based goal: Read for 20 minutes each day (time spent reading is seen under “Study Time”)
Both of these can be checked on your LingQ stats page. I typically prefer “Words of Reading”-based goals since listening time is also counted toward “Study Time” - they can easily get mixed up together.
LingQ-based goals: At the start, you can set LingQ-based goals, like "read until I’ve created 50 new LingQs." This works well initially, but as you learn more and build a larger bank of known words, switching to a "Words of Reading" goal makes more sense. Because creating 50 LingQs will take longer since there will be fewer and fewer words you don’t know.
What goal to set: Start with a highly achievable but slightly challenging goal. One where you need to push yourself a little bit to finish it, but not so much to where it becomes overwhelming. A goal needs to be super clear for us to actually do it. If it’s not clear, it easily becomes avoided. And your goal needs to be a non-negotiable that you will do every day no matter what. This will build momentum which will lead to increased motivation.
Supercharge your progress with ‘Sprints’
Setting a more ambitious goal for a limited season—so called ‘sprints’—is way to boost your progress. This is when you up the intensity level of your goals for a season. It can be a week, it can be a month, or even two months. This is a great way to boost your progress by increasing your daily activity, but only do it for a short time so that you don’t burn out.
Be strategic about your sprints. If you know the next few weeks are gonna be busy, then maybe it’s not such a good idea to do one. But if you know you’ll extra time because of vacation or some other circumstance (I read a ton years ago when I worked night shifts as a caretaker) then that might be a good time to do a sprint.
And after the sprint is over, you go back to your “normal” baseline goal again.
8. Long-term Benefits and What to Expect
Congrats for making it this far! This LingQ tutorial have taken you from setup to reading your first book. You now know everything you need to take your reading from basic to highly advanced.
What to expect: After you’ve read 3-5 books with LingQ, adding words to “known” will happen so quickly that it becomes addictive. This is when it becomes super fun! What once felt like an impossible climb to 10,000+ words now feels sliding down that mountain on a toboggan! You’ll stop feeling overwhelmed and start enjoying the story flow.
When does reading get easier? Your first book is always the hardest. My first book in Cantonese was painfully slow. But once you finish it, you’ll have the confidence that you can read any book. Reading then gets progressively easier, especially after reaching around 5,000-10,000 known words (though the amount varies by language). You'll read faster and understand more and more sentences in one pass, instead of having to re-read them because of getting lost in the meaning halfway through the sentence. The again, difficult level also depends a lot on the book you’re reading.
Longterm benefits and motivation: Consistency is everything. Those daily reading goals compound into massive results: effortless listening, natural conversations with natives, stronger writing skills, and you’ll be able to express yourself more eloquently and more accurately. Eventually, you won’t even need LingQ anymore but can just pick up any paperback book!
I’m on my 22nd book in Finnish - now no Finnish content is incomprehensible to me. When I taught Swedish online, the students with the strongest ability to express themselves when speaking were the heavy readers.
Reading books truly is the gateway to advanced language skills. Just balance it with lots of listening input, stay consistent, and you’ll reap amazing results!