The Ultimate LingQ Settings Guide: Complete Setup Tutorial

This post contains affiliate links. I may earn a commission on purchases made through links in this post. Read full affiliate disclaimer here.
LingQ has completely revolutionized how I learn languages. After using it daily for over six years—learning Spanish, Cantonese, and Finnish—I can confidently say that I think LingQ is one of the most powerful language learning tools available (read my full LingQ Review after 6+ years of daily use here.)
It’s the number one tool I recommend for learning to read in your target language. It transforms authentic content—books, articles, podcasts—into interactive lessons where you can instantly look up words, track your progress, and build vocabulary naturally.
The problem? LingQ has a lot of different settings, which is great for customizing your experience. However, most people don't optimize their settings, missing out on features that could really transform—or even hurt—their experience. And I get why: it’s not immediately obvious what the different settings do, let alone how they actually impact your language learning.
This LingQ settings setup guide is a comprehensive tutorial that covers only the mobile app settings (aside from one extra setting for desktop). However, the settings are nearly identical to desktop, so once you understand and have set up these, you'll be able to easily navigate both platforms.
You’ll learn:
Which setting I recommend
What each setting does
Why I recommend this particular setting
There’s also a “Quick Checklist” you can use for those of you who prefer a quick setup.
Once you’re done, you don’t need to touch these settings again (unless you want to tweak something) but you can instead focus on what’s important—improving your language skills through immersing in interesting content.
If you’re not yet signed up, create a Free LingQ account here before diving into the settings!
Why the Right LingQ Settings Matter
The wrong LingQ settings lead to things like:
Accidentally turn the page that marks all words as “known”
A cluttered interface that leads to a distracting experience
Unnecessary added clicking that makes LingQing feel more tedious
Missing out on seriously helpful features (such as the by far easiest font to read, and getting AI context-based definitions)
Reading the transliteration and never really learning to read in your target language (for learners of non-Latin script languages)
Having the right and optimal LingQ settings will ensure a great learning experience. Some small tweaks can make a big difference in having a smooth learning flow and will allow you to maximize your language learning with LingQ.
If you don’t need explanations, and just want a quick copy-paste-setup, jump straight to:
→ Quick Setup Checklist
How to Use This Guide
To get the most out of this LingQ guide, I recommend opening up the settings while in a LingQ lesson. That way, you can instantly see what each tweak looks like, since you already have a lesson open to check the changes.
Here’s how to it:
Open any lesson in LingQ
Click on the three dots in the top right corner.
Select Settings
You’re now ready to make some tweaks that will transform your LingQ experience more than you might expect!
Follow along on your own phone—each section includes a screenshot, making it easy to copy the exact settings to your device.
Avoid These Three Critical Mistakes First
Before diving into all settings, immediately change these three first as they can seriously hurt your LingQ experience:
❌ “Paging Moves to Known" - Turn this OFF immediately
This will mark all words as "known" on the page when you accidentally turn the page. It's definitely the most frustrating default setting that you want to change right away.
❌ "Tap to Page" - Turn OFF
Prevents accidental page turns when trying to click words.
❌ "Show Transliteration" - Turn OFF (for non-Latin scripts)
Seeing romanized text defeats the purpose of learning to read a different script. Click on the words to see their pronunciation instead.
New to LingQ? Create a free account here:
Quick Setup Checklist
If you don’t want any explanations but just the right settings, copy these:
App:
✅ Theme: Light
✅ Time Zone: Accurate
✅ Download Playlist on 3G: OFF
✅ Interface Language: Any
Languages:
✅ Level Filter: Set one level above and below your current level
✅ Daily Goal: Casual (50 coins)
✅ Daily LingQ emails: OFF
Reader:
✅ Font Style: ADYS
✅ Line Spacing: 0.80x
✅ Highlighting: Standard
✅ Autoplay TTS: ON
✅ Stop Lesson Audio to Play TTS: OFF
✅ Voice:
Web Voices: ON
Select a voice with the accent you’re learning
✅ Tap to Page: OFF
✅ Paging Moves to Known: OFF
✅ Auto LingQ Creation: ON
✅ Show Vocabulary in Sentence View: OFF
✅ Popup settings
Always Show Status: ON
Show Contextual Meanings: ON
Merge Separate Meanings: ON
Transliteration: Enable (Pinyin/Romaji/Latin) (non-Roman scripts only)
✅ Translation: DeepL
✅ Dictionary: English (only)
✅ Script Settings: OFF (For non-Latin alphabets only)
Show spaces between words: OFF
Review:
✅ All Review Games: OFF
Note: Some of these will vary depending on the situation, but this will provide a solid foundation in no-time.
Want detailed explanations of every option? Keep reading for the full breakdown of the best LingQ settings - including why each one matters and when you might want to adjust them for your specific learning goals.
Settings Breakdown
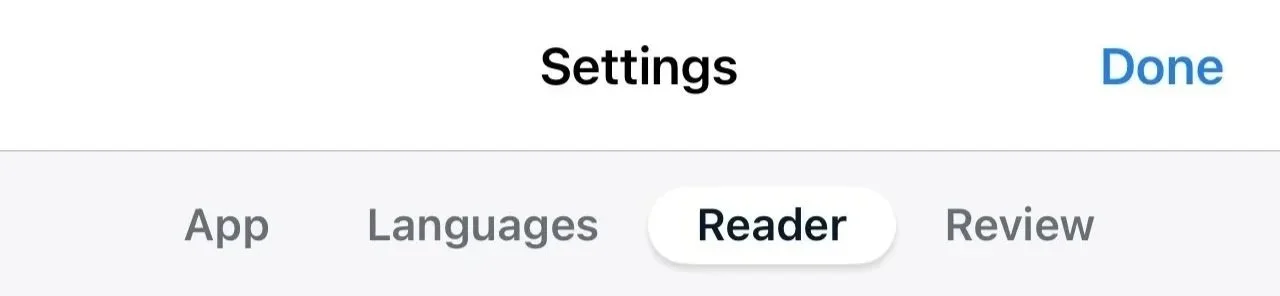
LingQ organizes settings into four categories:
App
Languages
Reader
Review
We’ll go through each of these four categories in order to make it easy to follow and copy each setting.
These settings will apply no matter what language you’re learning. However, if you’re learning a language with a different script we’ll also go through what script settings to select for effective learning. If you’re learning a language that uses the Latin alphabet (i.e. Spanish, German, etc.) you can just ignore those parts (they won’t even show up in your LingQ settings).
📱 App
The App settings are your foundation - they control LingQ's basic appearance and functionality. This section is quick to set up since it's mostly about personal preferences for how the app looks and operates.
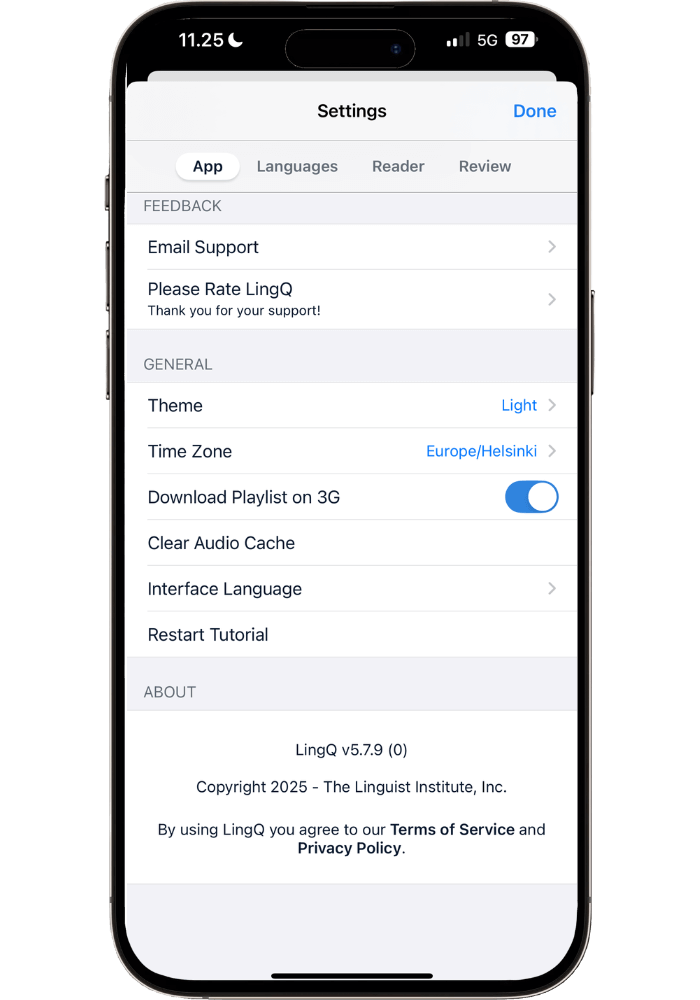
Theme
My recommendation: Light
What it does: Controls the overall color scheme of the app.
Why Light generally works better: Dark mode can make it harder to read, especially in Asian languages like Chinese that uses characters since words highlighted with blue/yellow take a bit more effort to read. However, some of you might highly enjoy dark mode for cozy late night reading.
Choose "System" if you want LingQ to automatically switch between light and dark based on your phone's display settings.
Time Zone
My recommendation: Track time zone ON
What it does: It determines when your streak resets
Why it matters: An incorrect timezone can break your streak without you realizing it (since you have until midnight in the set time zone to maintain it). With this on, LingQ will prompt you to automatically update your time zone when traveling.
Download Playlist on 3G
My recommendation: ON if you have unlimited data, OFF if you have limited data
What it does: Controls whether playlists automatically download over mobile data. When OFF, you'll need to manually download playlists when connected to Wi-Fi.
Why it matters: Prevents unexpected data charges if you're on a limited plan, but saves time if you have unlimited data.
Interface Language
My recommendation: English
What it does: Changes the language of LingQ's menus and navigation. This does not affect what language LingQ translates into.
Why English: The interface doesn’t matter much as it’s pure personal preference for navigation comfort. However, for this guide I recommend English so that you can easily follow along by having the same menu names in the settings. After you’re done with this guide, you can either stay with English or switch to whatever language feels most natural to you.
🌍 Languages
Language settings shape your learning experience - they control what content you see and goal setting. A few smart choices here will keep you motivated without being overwhelmed.

Level Filter
Level Filter My recommendation: ±1 to your level (one level above and below your current level) OR keep all levels visible if you prefer browsing everything.
What it does: Controls what difficulty levels appear in LingQ's content library. This matters less if mainly import your own content, but it keeps your library organized when browsing LingQ's built-in materials.
Why to ±1 works best: You'll have flexibility to read easier content when you want something relaxing or harder content when you're craving a challenge, without being overwhelmed by completely irrelevant material way too easy or way too difficult.
Keep in mind: LingQ's level ratings aren't perfect - content difficulty varies a lot depending on topic and your own familiarity with the topic.
Pro tip: Reading something interesting beats reading something at the perfect level. Plus, you can use LingQ's “Simplify With AI” feature to make any content easier if needed.
Daily Goal
My recommendation: “Casual - 50 Coins”
What it does: Sets the coin threshold to maintain your Daily Streak.
Why to keep a low daily goal: We all have days where things just simply get too busy. Setting your Daily Goal low will ensure you keep your daily streak and work as a “minimum goal”. Set rather other goals such as “read for 20 minutes” or “read 1,000 words” each day (luckily, LingQ provide several different metrics to measure and track these types of goals). Plus, both reading and listening rack up Coins, so I recommend counting reading and listening goals separately.
Alternative: If you do however prefer to rely on coins you can bump it up to 200 Coins to see steady progress. For Chinese, Japanese, etc. go with 100 Coins since the lack of conjugations means you’ll encounter new words less frequently = less coins earned through reading. However, if you’re also listening a lot on the LingQ app then 200 Coins becomes much more achievable.

Daily LingQ Settings
My recommendation: “Send Email” and “Send Notification” OFF
What this does: By enabling this, you’ll get an email and/or notification sent to you with the LingQs gathered today.
Why I recommend turning these off: I find getting daily emails reminders annoying and an added stress rather than helpful. Besides, when reading, I prefer focusing on learning words in context rather than through review.
Consider turning ON if: You enjoy daily vocabulary reminders and want extra motivation to review your LingQs outside of reading.
📖 Reader
Reader settings are the heart of LingQ - they control how you read, learn new words, and interact with content. These settings have the biggest impact on your daily learning experience, so they're worth getting right.

Font Settings
Size
My recommendation: Whatever feels comfortable
What this does: Adjusts font size in all LingQ lessons using the +/- buttons.
Why there’s no universally “correct” size: Everyone have a different sweet spot for what feels comfortable when reading depending on eye sight, age, etc.
Line Spacing
My recommendation: 0.80x
What this does: Controls space between lines of text.
Why 0.80x works well: Reading feels comfortable without making the text feel too spread out.
Style
My Recommendation: ADYS
What it does: Changes the font family for all lesson text.
Why ADYS is best: Originally designed for people with dyslexia, this font is scientifically proven to be easier to read. The letter shapes are more distinct, reducing reading fatigue (which is key when learning a foreign language!)
Highlighting
My Recommendation: Standard
What it does: Changes the style of highlighting for lingqs (yellow) and new words (blue).
Why standard works best: Words look like they’ve been marked with a highlighter pen, making them stand out more and the status of each word more obvious.
Alternative: If you find it too bold, “Underlined” is a good alternative.
Related Phrases
My recommendation: ON
What it does: When you click on a word, LingQ shows subtle grey highlighting around nearby words that might form a phrase or expression with your selected word.
Why it helps: This helps you spot common phrases and expressions you might otherwise miss. For example, if you click on "other" in a sentence, it might highlight "on the" and "hand" to show you the complete phrase "on the other hand." It's a gentle way to learn multi-word expressions without being distracting, and you can ignore it when it's not relevant.
Text to Speech
Autoplay Text to Speech
My recommendation: ON
What this does: Automatically plays pronunciation when you tap a word.
Why it's essential: Hearing pronunciation while reading is important to not reinforce bad pronunciation. You can always turn your volume down if you don't want audio in certain situations (if others are around, etc.)
Stop Lesson Audio to Play TTS
My recommendation: OFF (although depends)
What it does: Stops the lesson audio to play the text to speech when clicking on a word while listening.
What it depends: Sometimes you might want to get a clearer pronunciation of a word spoken in the lesson audio (ON). Other times you just want to see the definition without disrupting listening flow (OFF).
Voice
My recommendation: Use Web Voices ON.
What it does: Determines the accent and voice for TTS.
Why to Use Web Voices: They're higher quality than basic system voices.
What voice to choose: Choose the accent closest to what you want to learn (e.g., "Pablo (Spain)" for European Spanish).
Audio display style
My recommendation: By Sentence
What it does: Controls how LingQ highlights text as the lesson audio plays - either word-by-word in real time or sentence-by-sentence.
Why By Sentence is better: Real-time highlighting looks pretty neat by having a flowing line that goes from word to word. However, By Sentence highlighting is smoother and more natural when reading along with the audio, rather than chasing the moving highlight across the screen.
General Reading Settings
Tap to Page
My recommendation: OFF
What it does: When ON, tapping anywhere turns the page.
Why to turn it OFF: Prevents accidental page turns when you're trying to click on words. Swipe navigation is easy and more intentional.
Paging Moves to Known
My recommendation: OFF
What it does: When ON, turning the page automatically marks all blue words as "known."
Why this is dangerous: If you accidentally turn a page, LingQ will make all the words on that previous page “known” (white). This is one of the most frustrating default settings as you’ll have to then go back and manually click on each word to make them into yellow LingQs.
Exception: Leave this on is if you’re already at a high level when you start using LingQ. Then this setting is a time-saver since all words will be blue even though you might already know most of them.
Auto LingQ Creation
My recommendation: ON
What it does: Automatically creates a LingQ with the top definition when you click a word then click anywhere else.
Why it's convenient: Saves time - you don't have to manually select a definition every time. Just click the word and LingQ automatically chooses the top definition unless you deliberately choose a different one.
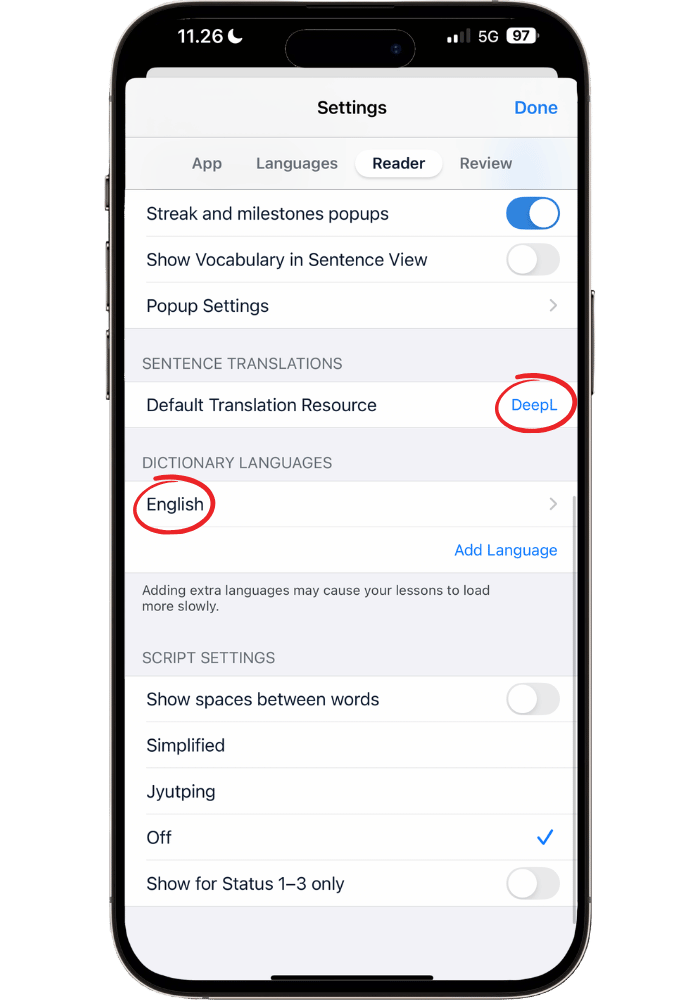
Streak and Milestones Popups
My recommendation: ON
What it does: Lets you know when you’ve hit your daily streak and milestones such as “you now know 1,000 words”.
Why it’s motivating to have on: These milestones are infrequent and great motivation boosters.
Show Vocabulary in Sentence View
My recommendation: OFF
What it does: Shows definitions of each LingQ and new word at the bottom of the screen while reading in Sentence View mode.
Why it's distracting: It adds screen clutter and pulls you to check definitions first, instead of reading in your target language and clicking to see definitions when needed.
Default Translation Resource
My recommendation: DeepL
What this does: Chooses which AI for context-based definitions and sentence translations.
Why DeepL is superior: Generally considered more accurate for translations, especially for European languages.
Dictionary Languages
My recommendation: Use only English (if proficient)
What it does: Determines what language(s) word definitions appear in.
Why English works best: Most LingQ users contribute English definitions, so you'll have more options available. Using only one language is also recommended by LingQ for a smoother experience.
Popup Settings
Controls what information appears when you click on a word to see its definition and status.
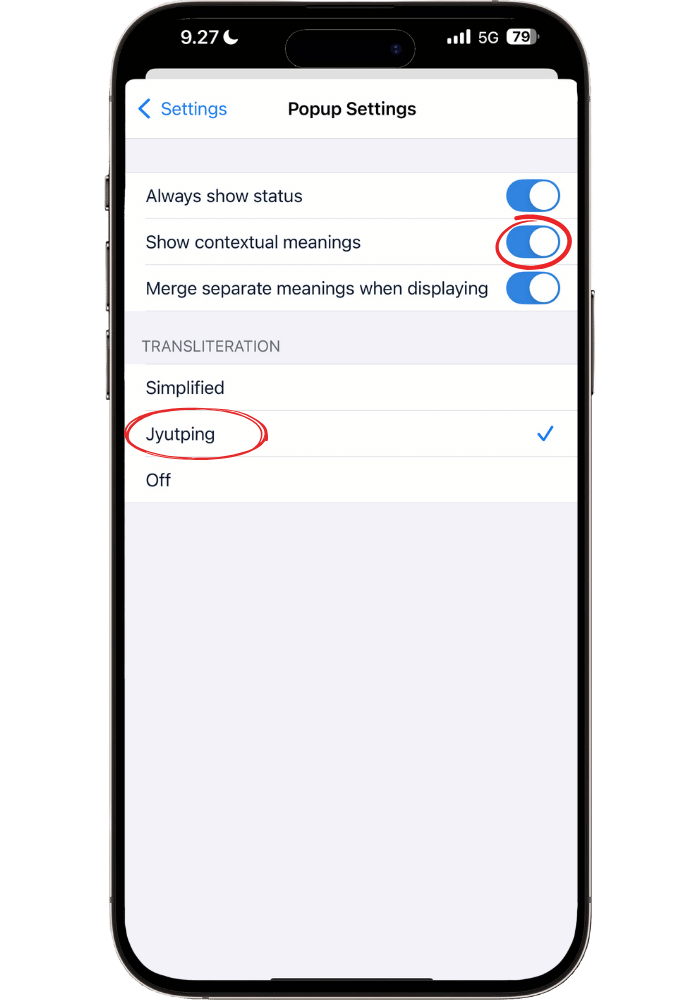
Always Show Status
My recommendation: ON
What it does: Always displays the word's learning status (New, LingQ, Known, etc.) when you click on it.
Why keep it ON: Saves you a click when you want to change a word's status to “Known”, etc.
Show Contextual Meanings
My recommendation: ON
What it does: Uses AI to suggest definitions based on how the word is used in that specific sentence.
Why to keep this ON: Context-based definitions are usually more accurate, giving you a definition that best fits the context. With this option OFF, you only get the dictionary and user-added definitions.
Merge Separate Meanings When Displaying
My recommendation: ON
What it does: When ON, definitions are separated by semicolons in a single paragraph. When OFF, each definition appears on its own line.
Why keep it ON: I find it easier to process and quicker to scan when all definitions are in one compact block, rather than separated by lines. It’s just a personal preference though - try both and see which feels more natural to you.
Transliteration (for non-latin alphabets only)
My recommendation: ON
What it does: Shows pronunciation (pinyin for Chinese, romaji for Japanese, etc.) when you click on words.
Why to show transliteration: Seeing how to pronounce a word is just as important as knowing its meaning. This gives you both the definition and pronunciation in one click.
Note: The exact name varies by language - choose Pinyin for Chinese, Romaji for Japanese, Jyutping for Cantonese, and Latin for other languages like Russian, etc.
Script Settings (For non-Latin alphabets only)
These options will only appear for languages with a different script like Chinese, Japanese, Arabic, Russian etc.
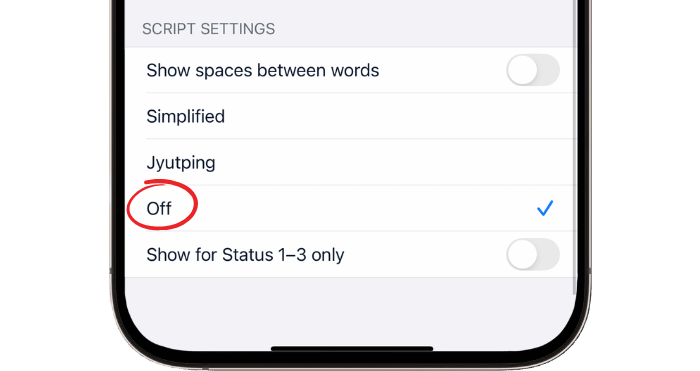
Show Spaces Between Words (For languages written without spaces like Chinese, Japanese, Thai)
My recommendation: OFF
What this does: Will add spaces between words for languages that don’t have these naturally.
Why: Getting used to reading without spaces early helps in the long run. It better prepares you to read outside LingQ.
Show Transliteration
My recommendation: OFF
What this does: Displays transliteration options (like pinyin for Chinese) above the text when enabled.
Why: If you rely on transliteration you won't learn to read the actual script. Force yourself to have click words to see the pronunciation.
Get My Free Language Learning Guide Intuitive Language Secrets!
Learn how to learn any language intuitively in my free guide—download now by clicking below!
Download Free GuidePS: Don't forget to claim your extended LingQ trial if you haven't already!
🔄 Review
My recommendation: Focus on reading in context rather than using LingQ’s review features
Why skip reviewing in LingQ: You’ll naturally encounter your LingQs again while reading new content, which is a more effective and natural way of reviewing words. Reading more content = faster and more natural progress than review games.
When flashcards DO work well: Flashcards can be very effective for words and expressions you want to learn from tutor conversations, or when sentence mining from TV shows/movies (using free tools like asbplayer with Anki, or apps like Lingopie, for example). But for reading-based learning, context beats flashcards every time.
If you still want to do some deliberate review: Go with “Flashcards” - it’s the most straightforward option. A great way to do this is to review the words from the lesson you just read at the end of the lesson. Keep sessions short and always prioritize reading time over review time.
Bottom line: More input (reading/listening) beats more review every time.
🖥️ One Must-Have Reading Setting for Desktop
The settings for desktop are very similar to the phone ones. Once you know how to set those up, just apply the same ones to the desktop settings.
There is, however, one settings that I recommend enabling on desktop: Double Page Width.
You’ll find it under Reader → Settings → Double Page Width.
Enabling this makes your reading experience feel like a real book, displaying text across two pages side by side, as in an open book. This creates a more authentic reading experience and organizes the text neatly.
What’s Next?
Now that you’re set up with the ultimate settings, you can now start reading effectively on LingQ! These settings will give you a clean, distraction-free experience that actually helps language learning instead of fighting against it.
With these optimized settings, you'll be ready to make the most of every single LingQ!
Want to learn how to use LingQ as a beginner and develop an effective reading routine? I recommend checking out my post: How to Read Books with LingQ: Complete Beginner's Guide for the next step in your journey and how to further maximize your LingQ learning.
For my full LingQ review, see my post: LingQ Review: The Ultimate Guide After 6+ Years of Daily Use